- About Us
- Testimonials
- Plastic Surgery Procedures
- Skin + Laser Lab
- Chemical Peels
- Exfoliation
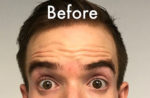
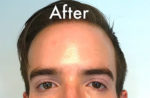
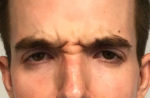
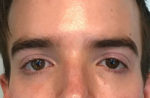
- Injectables
- Lasers
- AviClear™
- Cellutone
- Clear + Brilliant
- CO2RE Laser
- Emsculpt
- Emtone
- EmFace
- Exilis Ultra
- Fractional Laser Resurfacing
- Glacial Rx
- IPL Photofacial
- Laser Hair Removal
- NuEra Tight RF
- Pico Way/Pico Resolve (Tattoo Removal)
- Renuvion
- Stellar M22™
- Ulthera Skin Tightening
- Vaginal Rejuvenation | Dr. Shafer
- Vanquish
- VBeam Perfecta
- Vbeam Prima
- MediThreads
- Pain Management Device
- Products
- Skin Care
- Vaginal Rejuvenation | Dr. Shafer
- Metabolic Aesthetics
- News & Videos
- Special Services
- Photo Gallery
- Patient Resources
- Contact Us | Dr. Shafer
- Shop